Complete Guide to 3D Puff Embroidery (Digitizing to Machine Setup)
3D puff embroidery is one of the most popular embroidery styles used on hats, especially for bold logos that need depth and texture. However, achieving clean and professional results requires more than simply loading a design into a machine.
From proper digitizing techniques to machine setup and finishing, each step affects the final result.
At W88 Prime Wear, many of our clients request 3D puff embroidery digitizing, and one of the most common challenges they mention is getting the foam coverage and stitch structure correct. This guide explains the full process and highlights key techniques to help embroiderers produce consistent results.
Whether you are new to puff embroidery or looking to refine your process, this breakdown will help you understand the most important steps.
Understanding 3D Puff Embroidery
What Makes 3D Puff Embroidery Different?
Unlike standard embroidery, 3D puff embroidery uses foam underneath satin stitches to create a raised effect.
The embroidery stitches compress the foam while surrounding it, creating the well-known puffed lettering or logo effect often seen on caps.
Because foam is involved, the design must be digitized specifically for this technique.
Important considerations include:
- Proper stitch density
- Correct stitch type (usually satin stitches)
- Foam placement
- Design size limitations
It is also important to set realistic expectations with clients.
Embroidery involves needle and thread piercing the fabric, and when foam is used, the result will not be as perfectly flat or detailed as a screen print or DTF print. The goal is dimension and texture, not photographic precision.
Preparing the Design for Digitizing
Use High Quality Artwork
Before digitizing begins, always ensure the artwork is suitable for embroidery.
Best file formats include:
- Vector files (AI, EPS, SVG)
- High resolution PNG or JPG
- Clean line artwork
Designs with very small details or thin lines may not work well for puff embroidery.
Software for 3D Puff Embroidery Digitizing
At W88 Prime Wear, two embroidery digitizing programs are used depending on the complexity of the project.
| Software | Best Use | Notes |
|---|---|---|
| Wilcom Embroidery Software | Complex designs | Industry standard with advanced digitizing tools |
| Chroma Luxe | Standard embroidery projects | Reliable software included with Ricoma machines |
For detailed logos or difficult layouts, Wilcom provides greater control over stitch settings and foam compensation.
Key Digitizing Rules for 3D Puff Embroidery
Keep the Design Height Under 2.5 Inches
One of the most important rules when digitizing puff embroidery for caps is design height.
Maximum recommended height: 2.5 inches
Why?
Caps have a curved surface, and larger designs increase the risk of:
- Stitch misalignment
- Foam exposure
- Distortion near seams
Keeping the design within this range ensures the embroidery remains centered and balanced.
Foam Layer Setup
The foam layer must be prepared carefully during digitizing.
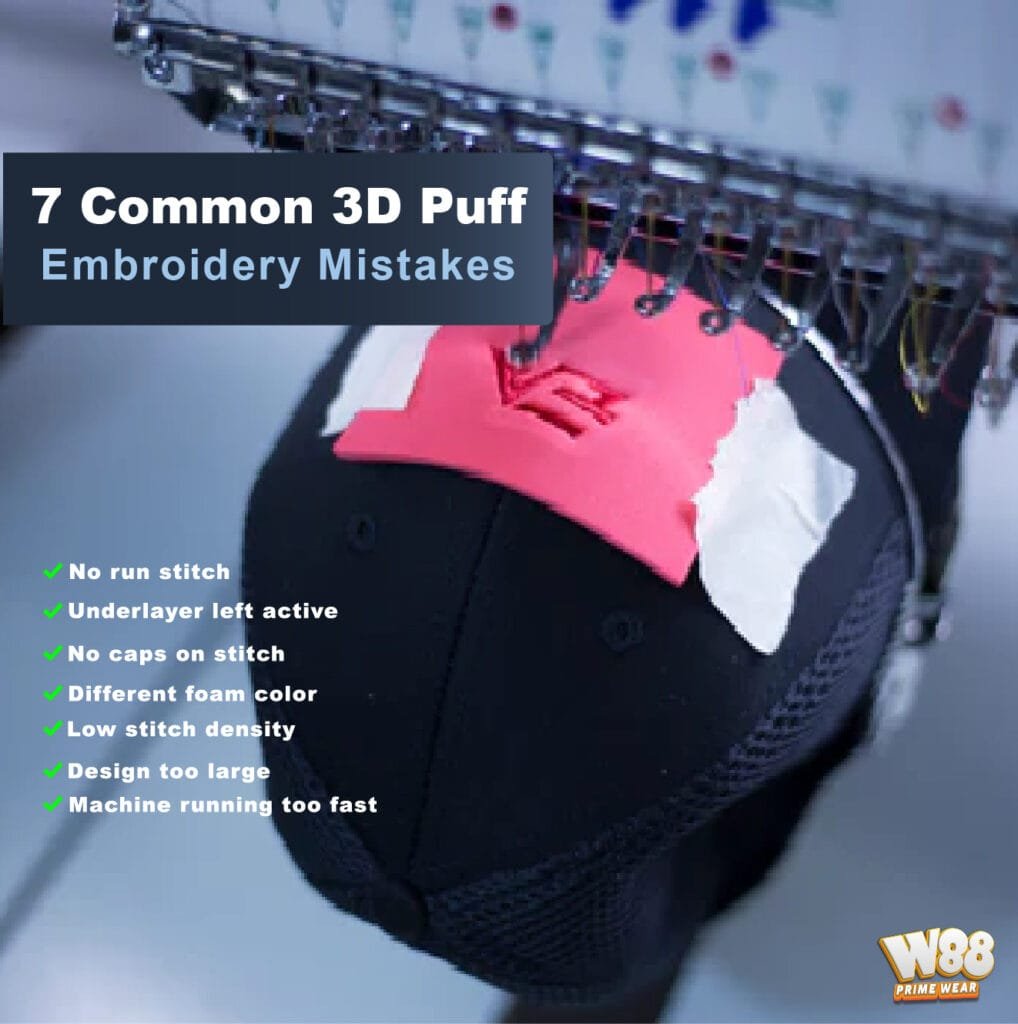
Step 1: Add a Run Stitch
Place a run stitch layer first.
This stitch does not need to be perfect. Its purpose is simply to:
- Hold the foam in position
- Create a placement guide
Step 2: Satin Stitch for Foam Coverage
After the run stitch, use a satin stitch with a density between:
0.18 mm – 0.20 mm
This density helps fully cover the foam while maintaining a clean raised appearance.
Important Rule
Remove the underlay stitches from the foam layer.
Underlay can interfere with foam compression and may cause uneven puffing.
Understanding Structured Caps (A-Frame Hats)
What is a Structured Cap?
A structured cap contains internal support material inside the front panels that keeps the hat rigid and upright.
Without this structure, the cap would collapse and lose its shape.
Structured hats are very common for 3D puff embroidery, especially styles like:
- Snapback caps
- Trucker hats
- A-frame caps
These hats provide a stable surface that supports the raised embroidery effect.
What is a Five-Panel A-Frame Cap?
The cap used in this example is a five-panel A-frame cap.
Characteristics include:
- One large front panel
- No center seam in the embroidery area
- Four additional panels forming the sides and back
Because there is no center seam, these caps are ideal for bold logos and puff embroidery.
However, they also present a common challenge.
Due to the rigid front structure, the embroidery surface is curved and thick. If the cap is not hooped correctly, the design may shift during stitching.

Proper Cap Hooping Technique
Before placing the cap in the embroidery machine, correct hooping is essential.
Recommended method
- Pull the sweatband outward.
- Fold it inside out.
- Tuck the sweatband under the hoop lip.
- Align the center line of the cap with the hoop guide mark.
Most cap frames include a center alignment line that helps position the design accurately.
Once the cap is secured, it can be locked into the hoop frame.
Needle and Thread for 3D Puff Embroidery
Selecting the correct needle and thread combination is extremely important.
| Component | Recommendation | Reason |
|---|---|---|
| Needle | 80/12 embroidery needle | Reduces vibration and breakage |
| Thread | 40 weight embroidery thread | Strong coverage and durability |
| Foam | 3 mm embroidery foam | Ideal height for puff designs |
Why These Settings Matter
The 80/12 needle penetrates the foam cleanly without excessive friction.
The 40 weight thread provides enough coverage to hide the foam while maintaining a smooth satin finish.
If the thread is too thin or the needle too small, foam may remain visible.
Loading the Cap into the Machine
Once hooped, the cap must be loaded correctly into the embroidery machine.
On machines such as the Ricoma MT-2001-8S, the process involves:
- Rotating the hoop about 180 degrees
- Positioning the cap so the brim does not hit the machine
- Locking the frame into place
When properly installed, you will hear three clicks confirming the hoop is secured.
Positioning the Foam
After the cap is mounted, the 3 mm foam must be placed over the embroidery area.
Common methods for securing the foam include:
- Small pieces of tape
- Rubber bands
Once the machine stitches the run stitch, the foam is already secured and the tape can be removed.
Running the Embroidery
Even when the design uses only one thread color, it is useful to separate the process into two steps.
Step 1 – Run Stitch
The run stitch holds the foam and allows the operator to verify alignment.
Recommended machine settings:
- Trim
- Stop
- Offset
These pauses allow you to remove tape and inspect the placement before the main stitching begins.
Step 2 – Satin Stitch
The satin stitch compresses the foam and creates the raised effect.
Although many embroidery machines can run at 1,000 stitches per minute, running puff embroidery slower often produces better results.
Recommended speed:
600 stitches per minute
This helps maintain stitch accuracy and reduces thread breakage.
Cleaning the Finished Puff Embroidery
Once the embroidery finishes, remove the cap from the frame.
To clean the design you will need:
- Tweezers
- Small scissors
- Heat gun
Removing Excess Foam
Because the satin stitch perforates the foam, it can usually be peeled away easily.
Use tweezers to remove any remaining foam pieces.
Using Heat to Finish the Puff
A heat gun helps shrink and seal small foam fragments hidden under stitches.
Important precaution:
Do not keep heat in one place for too long, as excessive heat can damage both the thread and the fabric.
When done correctly, the result is a clean and professional 3D puff embroidery finish.
Quick Reference Guide for 3D Puff Embroidery
| Step | Key Tip |
|---|---|
| Artwork | Use vector or high-resolution images |
| Design Size | Keep height under 2.5 inches |
| Stitch Type | Satin stitch for foam layer |
| Density | 0.18 – 0.20 mm |
| Needle | 80/12 |
| Thread | 40 weight |
| Foam | 3 mm |
| Speed | ~600 stitches per minute |
Professional 3D Puff Embroidery and Digitizing Services
If you run an embroidery shop and need help preparing designs for puff embroidery, professional digitizing can make a major difference in your results.
At W88 Prime Wear, we offer:
- Professional 3D puff embroidery digitizing
- Custom hat embroidery
- Fast service embroidery for businesses and brands
- Custom apparel decoration for companies and events
Our goal is to ensure your embroidery runs smoothly and delivers the best possible quality.
Final Thoughts
3D puff embroidery is one of the most striking techniques in cap decoration, but success depends heavily on proper digitizing, machine setup, and finishing techniques.
By following the correct steps for:
- Design preparation
- Foam placement
- Stitch density
- Machine speed
you can consistently produce bold and professional results.
CTA
Want more embroidery tips and digitizing tutorials?
Subscribe to the W88 Prime Wear blog and stay updated with professional embroidery techniques, equipment tips, and custom apparel insights.
Or contact us today if you need professional embroidery digitizing or service embroidery for your next project.


![Tribal Skull Warrior – T-Shirt [warrior spirit]](https://w88primewear.com/wp-content/uploads/2025/08/WJD-L-000008-T-1-300x450.jpg)